

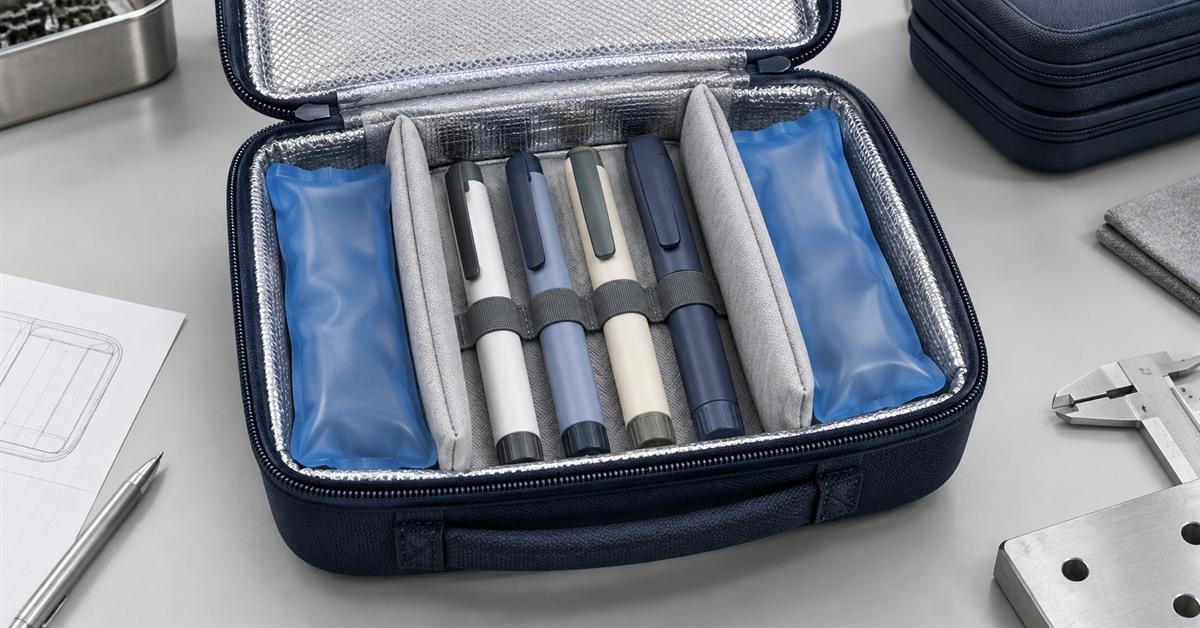
Briefly: Open our current four-pack sample; you won't see the gel packet next to the pen. Lift the foil-lined tray, and you'll find two small sewn pockets at the bottom, each containing a 75g gel packet. These pockets were assembled on a workbench based on pre-prepared gel packets. Because the circular center of the gel packet is larger than we anticipated based on the flat dimensions, more space was required.
Buyers often ask us how many grams of coolant a computer case needs. My first question is: after carrying the case in a backpack for an hour, where will the coolant remain?
The answer made a lot of sense to me. Perhaps one pen will eventually fall near the coolant. Perhaps the cap needs to be pressed down first so the zipper can go around the corner. Perhaps the user has to remove the cooling layer to get the pen. These three points are design flaws, unrelated to heat dissipation performance.
Can insulin be placed next to an ice pack?
No. In the samples we discussed, both ice packs were placed below the divider, while the insulin pen was placed above it. Buyers might write "insulin ice pack" or "insulin cooling pack" in the briefing. But on the sample table, I still need the finished product and the pocket to hold it. Adding a larger size ice pack might take up space for a fourth insulin pen or syringe case, and might also place the coolant closer to the medication.
The U.S. Centers for Disease Control and Prevention (CDC) diabetes travel guidelines advise travelers not to place insulin directly on ice or ice packs. The U.S. Food and Drug Administration (FDA) insulin storage guidelines also state that frozen insulin should not be used. Therefore, placing bulk ice packs next to insulin pens in this situation is inappropriate.
On the sample stage, I check three things before closing the box: the partition covers both sample packs, the pockets secure them in the same position, and the loading order is clear. If someone later puts a sample pack that was next to the pen back next to the pen, the temperature results measured from the sample pack that was previously under the pen cannot be reused.
What does the current Pengtour sample contain?
Our reference sample box has two pockets at the bottom, each holding a 75-gram soft gel packet. Both gel packets were placed at -18°C for 4 hours before testing, remaining soft when the sample was loaded. We then placed a foil-lined tray on top and inserted four analog pens into the upper compartment.
The cut at the pocket opening is close to the finished packaging size. I slid the packaging completely in and smoothed its edges below the tray line. When I lifted the tray, two coolant reservoirs were visible. After placing the tray back in place, the packaging edges did not extend into the pen tip area.
I didn't approve of the first pocket model on the drawing. I compared the flat reference sample on the workbench with the bag that had been frozen at -18°C for 4 hours. The middle section now felt bulging, and the seal edges were more resistant than before. After pushing the bag back into place, I put down the tray and returned the pens to their original positions. Then, without pressing the lid with my other hand, the zipper could smoothly go around each corner. If the zipper couldn't be opened smoothly, I opened the box and remeasured the pocket depth and the total stack height of the pens.
The resistance at the corners forced me to re-examine the inside of the case. I checked the pocket depth, tray thickness, and the position of the gel pouch seal. Replacing it with a thicker zipper didn't solve the problem. If the coolant is supplied by the buyer's vendor, a ready-made case is far more useful than a screenshot from a product page.
Why put the packaging bags under the fence?
The filling order for this sample is fixed. First, place two packets of pens in the lower compartment. Then, lower the tray and place the pens in. When reopening, I remove one pen first without touching the tray. Only then do I lift the tray to check the bottom. Each packet of pens should still be in the position it was in before the box was upright.
This stacking method requires sufficient shell depth. When the form factor is very narrow, the diameter of the packaging box, tray, and pen may already occupy all the available height. We examine the cross-sectional drawings before creating the structured EVA shell. Forcing the soft model closed will only mask the gap problem, not solve it.
The package can be moved to another location. The checkpoint will also move accordingly.
The side pocket shortens the distance at one end of the pen slot and increases the distance at the other end. It also takes up some of the width that could have been used to store accessories. If the buyer wants this layout, factory testing requires measuring the readings at both ends of the pen slot. Measuring only the reading at the middle position will not reflect this difference.
While the pocket on the cap makes it easy to access, it adds weight above the hinge. I'll first put the pen in to see if the pen body pulls back when the cap is opened. Then I'll slowly close the cap and observe if there's any pressure on the pen cap, dosage button, and display. The results of testing the bottom pocket don't answer these questions.
Will the gel pack remain in place after the box is moved?
Before conducting the closed-chamber test, I packed the boxes on the workbench. One pre-prepared sample packet was placed in each lower pocket. After setting down the tray, four representative pens were returned to their marked positions. I zipped up the boxes, moved them to the other side of the sample chamber, stood them upright, rotated them slightly, and then brought them back to the workbench.
Opening the packaging allows you to determine if the packing diagram has survived normal handling. I first check the edges of both boxes. Neither edge should detach from the recess or lift the tray. The tray should still completely cover the coolant area. Above the tray, each pen should remain in its original position and can be removed completely without removing other parts.
This quick inspection is designed to detect obvious pocket or spacing errors before temperature testing. Buyers requiring specific drop or vibration testing protocols can add this to their project briefing, specifying the sample quantity and acceptance criteria.
Why can three air quality readings display content that a single monitor cannot?
This project involves insulin labeled for use at temperatures below 30°C. During factory testing, three probes from an independent data logger measured the air temperature within the loading compartment. One probe was located on the left, one between the four insulin pens, and the other on the right.
All three readings must be below 30°C. We stop timing once the first reading reaches that value. We also record the lowest reading reached during the experiment.
Both ends are important because the middle position can mask unevenness in the layout. If both bags are moved to the left, the air near the left bag may become colder, while the right bag will reach 30°C first. The readings for the left, middle, and right sides will reflect this difference.
These probes are factory testing equipment. The finished product casing may have a simple display for easy, real-time readings, but this display is not a three-channel data logger. Please refer to our insulin cooler temperature display and data logger guide for specific differences.
How to compare the positions of two types of packaging?
Let's say the buyer wants to compare the existing bottom pocket and side pocket. I would build a second solution using the same four pens and the same two 75g packs. The freezer settings and preparation time remain the same. The ambient temperature, recording intervals, box orientation, and opening method also remain the same.
After the test, the evaluation sheet showed the first probe to reach 30°C and the location of the lowest reading. I then reopened the box and used it like a buyer: zipped up the two corners again, took out each pen, and saw what effect the side pockets had on the accessories area.
In this comparison, only the pencil case's position changed. The same two pencil cases and four pens were placed back into the same pen body, using the same pen holder. If a different pencil case or a deeper pen body is needed, a separate record will be made, so the pencil case trial will not be confused with the second review.
How do I mark gel packs on a drawing?
The production drawings should show both the packaging orientation and the drug loading capacity. I will annotate the following details on the same drawing:
- Gel pack specifications, flat dimensions, net filler volume, and quantity;
- Refrigeration unit setup, preparation time, and loading conditions;
- The finished length, width, and opening direction of the pocket;
- Pallet material, finished product thickness, and installation location;
- The pen's model, quantity, and orientation;
- The left, middle, and right positions of the factory recorder probe;
- Ambient temperature, recording interval, and time count end rules.
The sample file includes a setup photograph alongside the drawings. The photograph shows the packaging box fully pushed into the pocket, the tray placed on top of it, and the position of each probe lead entering the housing. We used the same sample number in the photograph, drawings, and original record files.
This is especially important at the sewing line. The operator might slightly increase the width of the bag to facilitate assembly. But this tiny allowance is enough for the bag to slide under the tray. Therefore, in the cross-sectional view, we place the prepared bag inside the finished bag, with the tray directly above it.
What should the buyer send before opening the box?
Before sending out the presentation, lay all the test kits out on the table. Place a small handwritten card next to each pen or vial, indicating its size and quantity, so it will be visible in the top view. Also, take photos of the needles, wipes, blood glucose meters, and test strips. If these items arrived after the drawings were completed, we will usually need to adjust their positions.
Next is the gel pack. Finished product packaging provides the best reference. While sourcing channels are open, the briefing can use the flat dimensions and reference data provided by the supplier, as well as measured fill weight, center depth, and seal width. Add usage instructions. A front-facing photo helps us identify the packaging, but it doesn't accurately show the center depth.
Please specify the maximum external dimensions and planned environmental testing temperature in the briefing. We also need the required carrying time and applicable drug label limits. Please manually mark the preliminary location first. We will proceed with the CAD design after the layout discussion is complete.
Please refer to the insulin cooler pack sample approval checklist for a record of approved configurations. The travel insulin cooler box design briefing covers the input information required for the initial draft. Once the loading and gel pack protocols are ready, please send them to Pengtour for OEM sample review .