

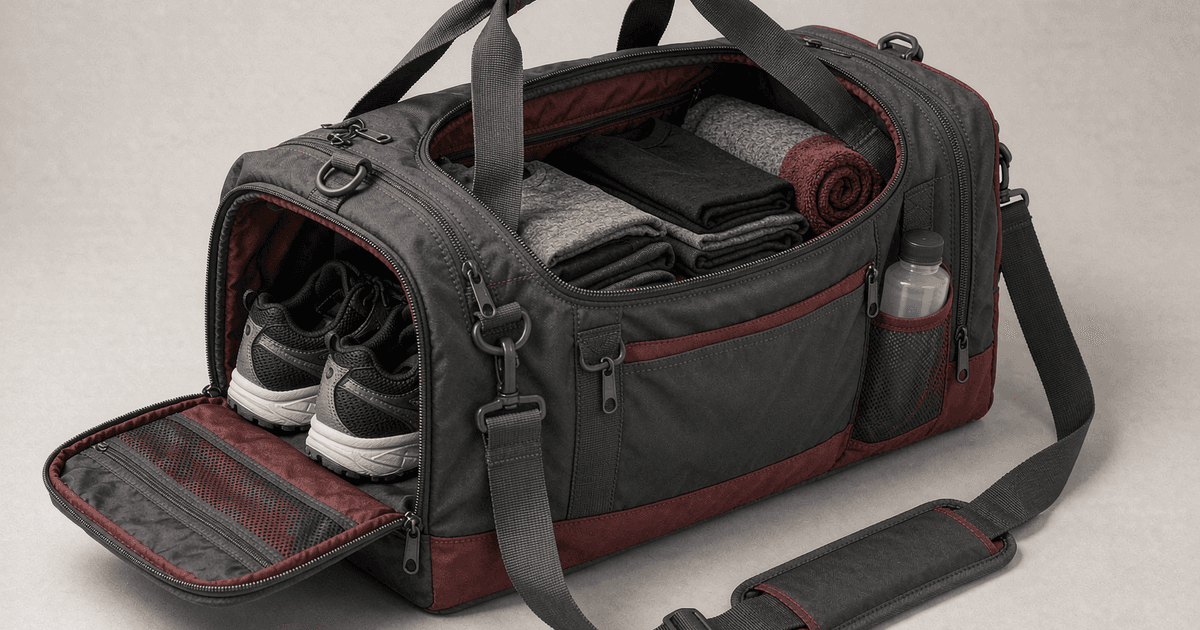
A gym bag with a shoe compartment is not specified by adding one extra pocket to a standard body. The shoe size, sole shape, access direction and loading sequence all affect the main compartment, zipper path, wet-item storage and carry balance.
For a brand or private-label buyer, the useful brief starts with the actual footwear. Record the largest shoe the range must accept, show how it enters the bag, and review the complete loaded layout before approving the first sample. That turns a popular product feature into a specification a manufacturer can quote and develop.
This article focuses on the shoe-compartment task. A broader custom gym bag size guide covers overall length, width, height and storage limits. The shoe-specific questions below should feed into that wider size decision.
Start With the Shoe Load, Not the Pocket Name
"Shoe compartment" is too vague for pattern development. A low-profile training shoe, a high-top basketball shoe and a thick outdoor shoe can occupy very different shapes even when the nominal size is similar.
Before asking for a sample, provide a representative footwear set:
- shoe type and intended use
- largest size in the target range
- outside length, width and height at the highest point
- pair count
- left and right shoe orientation, if it matters
- whether the shoes enter heel-first, toe-first or as a pair
- whether the shoes have rigid soles, high collars, cleats or other projections
- whether the compartment should accept the shoe bag, laces or related accessories
- whether the same compartment must work for several shoe models
Measure the actual shoes or send a physical reference when the shape is difficult to describe. A size label alone is a weak development input because two shoes with the same nominal size may have different soles, collars and upper volumes.
Do not turn one sample shoe into a universal fit promise. If a product line covers several markets or shoe types, define the intended range and identify the largest or most difficult reference pair for sampling.
Choose the Shoe Compartment Position Around the Loading Route
Side, end and base compartments are different access systems. The best position depends on where the user places the bag, which items are already loaded, and whether the shoes should be reached without opening the main compartment.
Side-access shoe compartment
A side opening can let the user load footwear without moving clothing in the main body. It works well when the bag is placed on a bench or held upright, but the side panel must have enough usable opening for the shoe sole and heel. The loaded shoe can also push inward and reduce clothing space.
Check whether the zipper corner is clear of the shoe's highest point. A pocket can have enough flat panel area but still be difficult to use if the opening stops before the heel or if the sole catches the zipper path.
End compartment
An end compartment can use the width of a duffel-style body and may give the shoe a more direct entry path. The trade-off is that its volume may project deeply into the main compartment. The drawing should show the loaded shoe alongside the empty pocket outline.
Review the end compartment with the bag standing, lying on its side and carried in the intended direction. The opening may feel convenient in one position and awkward in another.
Base or lower compartment
A lower compartment can separate shoes from clothing by level and may suit a travel or team-bag format. It also changes the base construction, the bag's resting behavior and the stress around the lower zipper and corners.
A lower shoe compartment should be reviewed together with the bottom panel, seams, zipper ends and carry structure. See the custom bag stitching and reinforcement guide for the wider way to identify stress points without assuming one fixed reinforcement method.
What to record in the layout drawing
Whichever location is selected, mark:
- shoe-compartment usable length, width and height
- opening length and direction
- zipper start and end points
- shoe orientation
- the highest or widest shoe area
- the direction in which the loaded shoe expands
- the space taken from the main compartment
- nearby wet pockets, bottle pockets, dividers and strap anchors
- the condition used for measurement, such as empty or loaded
This is more useful than a note that says "add a side shoe pocket." It gives the supplier a defined structure to review and gives the buyer something specific to check on the sample.
Show How the Shoe Space Changes the Main Compartment
A compartment does not create new volume. It divides the space already available in the bag, unless it is built as a genuinely external structure.
The empty sample can make this trade-off look smaller than it is. Soft fabric lies flat when unused. Once shoes are inside, the sole, heel and upper occupy a firm block that can press into clothing, bottles or the opposite wall.
Prepare two layout views before sampling:
- Empty bag: show the pocket shape, opening and surrounding panels.
- Loaded bag: show the reference shoes in the intended orientation and the remaining main-compartment space.
Then add the other contents that define the product: clothing, towel, bottle, toiletries and small personal items. If the bag is meant for commuting or weekend use, include the work or travel items as well. A shoe pocket that works for footwear alone may fail when the complete load is present.
Ask four practical questions:
- Can the shoes enter and leave without forcing the opening?
- Does the loaded shoe block the main zipper or another pocket?
- Is enough usable space left for the stated clothing and towel load?
- Does the shoe position pull the bag to one side or change the carry balance?
The answer should be recorded as a layout decision, not hidden in a chat message. If you are comparing the total bag envelope, use the custom gym bags category as the commercial product route and keep the shoe-compartment decisions in the RFQ or Tech Pack.
Review Shoe Storage With Wet and Clean Gear
Sports bags often need to separate several problem loads at once: dirty shoes, damp towels, clean clothing, bottles and small valuables. Adding a shoe compartment and a wet pocket without checking their combined volume can leave a narrow and difficult-to-pack main space.
The gym bag wet pocket design article covers wet-item separation, lining, closure and the boundary between a lined pocket and a waterproof or leakproof claim. For this shoe-compartment brief, the key question is how the two structures interact.
Specify whether the shoe area and wet area are:
- fully separate compartments
- two sections sharing one external panel
- one combined dirty-item zone
- a fixed pocket plus a removable pouch
- an internal area and an external area with different access routes
Then load both. A shoe may press into the wet pocket lining. A wet towel may expand into the same main-compartment space needed by the shoe. A bottle pocket may become hard to reach when both side areas are full.
Do not describe mesh, ventilation openings, coated fabric or a water-resistant-style zipper as automatic odor control, leak prevention or full-bag waterproofing. Those are separate project requirements that need defined materials, construction and testing evidence.
Define Opening and Removal, Not Just Fit
A shoe can fit inside a pocket and still fail the use case. The user may not be able to grip the heel, clear the sole, or remove the shoe while the main compartment is full.
The brief should state the intended access sequence:
- Place the bag on the expected surface or hold it in the intended position.
- Open the shoe compartment using the planned pull direction.
- Insert the first shoe and observe where the sole and upper contact the opening.
- Insert the second shoe if the pocket is designed for a pair.
- Close the compartment without forcing the zipper around the shoe shape.
- Reopen it and remove the shoes without unpacking clean clothing.
- Close the main bag and carry it with the agreed contents loaded.
Review the zipper path, corner turns, lining movement, pocket binding and nearby seams. A wider opening may improve access but can change the panel shape and the amount of space available for branding or another pocket. A smaller opening may preserve the silhouette but make the shoe compartment frustrating to use.
The sample review should use the same representative shoes that defined the brief. If the target range has a size run, identify which reference pair controls the opening and which pair controls the pocket volume.
Check the Bag Under the Agreed Load
Pengtour's first-party duffel evidence supports reviewing actual contents or an approved mock load before and after sample development. The review can cover loading fit, access, loaded shape, closure, zipper operation, obvious interference and obvious one-sided loading. It is an ordinary sample-use review, not proof of load capacity, durability, transport protection or zipper-cycle life.
A practical shoe-compartment sample check can include:
- exterior dimensions under the agreed measurement condition
- shoe-compartment usable dimensions
- opening width and access direction
- shoe insertion and removal
- remaining main-compartment space
- clothing, towel and bottle access after the shoes are loaded
- contact between the shoe and lining, zipper or nearby pocket
- closure operation with the full agreed load
- one-sided pull, distortion or obvious imbalance
- handle and shoulder-strap position after loading
- bottom and side seams, pocket openings and zipper ends for visible interference
- return of the empty pocket to a usable position after the shoes are removed
Do not convert an ordinary carry check into a fixed load rating. If the project requires formal load, abrasion, zipper-life, water-resistance or other testing, write the test method and acceptance criteria separately.
A Factory Example: Fix the Affected Area Before Making the Whole Bag Bigger
In one anonymized custom sports and gym duffel project, the buyer supplied representative contents for sample review: sports shoes approximately 30 x 20 x 12 cm, a bottle approximately 25 cm high, a towel, a change of clothes and small personal items.
The first loaded sample showed four layout problems. The shoes occupied too much of the main compartment. The bottle-pocket opening was tight. Loaded clothing interfered with part of the main zipper path. Small personal items were difficult to find.
The solution was not simply to enlarge the whole bag. The main-compartment proportions were adjusted, the side pocket was widened and deepened, the zipper path was revised, and an independent zip pocket was added. The same representative contents were then used to review fit, access, loaded shape, closure, zipper operation and compartment interference. The buyer confirmed the revised physical sample and structure, and the approved references were used for later production preparation.
The measurements in this example belong to that project. The reusable lesson is the review method: load the actual contents, identify the affected area, revise that area, and check the same load again.
Put the Shoe Compartment Into the RFQ or Tech Pack
A supplier cannot quote the same product if one party imagines a side pocket for low-top shoes and another imagines a deep end compartment for high-top footwear. Put the shoe structure into a controlled brief before comparing quotations.
Useful fields include:
|
RFQ field |
What the buyer should provide |
|
Intended footwear |
Shoe type, model range and largest reference pair |
|
Shoe dimensions |
Outside length, width and height at the highest point |
|
Pair count |
One shoe, one pair or more than one pair |
|
Pocket position |
Side, end, base, internal, external or combined dirty-item zone |
|
Access direction |
Entry direction, opening length and user position |
|
Usable space |
Internal shoe-pocket dimensions in the loaded condition |
|
Main-compartment trade-off |
Minimum remaining space for clothing, towels and accessories |
|
Interaction map |
Wet pocket, bottle pocket, divider, zipper path and strap anchors |
|
Material direction |
Outer fabric, lining, mesh, foam, board and hardware to evaluate |
|
Branding |
Artwork location and whether the shoe opening affects it |
|
Carrying method |
Handles, shoulder strap, backpack straps or other agreed carry mode |
|
Packaging |
Folded or packed condition, labels, hangtags and carton requirements |
|
Quantity and variants |
Quantity, color splits, size range, logo and packaging variants |
|
Approval basis |
Reference shoes, drawings, sample questions and any formal tests |
The wider bag Tech Pack sourcing guide can organize the complete document. The shoe-compartment block should still have its own drawing or marked photograph so the feature does not disappear inside a general pocket list.
Mark every dimension as a target, minimum, maximum or reference. State whether the measurement is empty, loaded, flat or three-dimensional. If the shoe model, pocket location, opening or main dimensions change after the quote, update the affected drawing and confirm whether a revised sample is required.
When a Shoe-Compartment Change Needs Another Sample
Not every wording change requires a new physical sample, but a structural change should be reviewed against the scope it affects. A revised sample may be needed when the change affects:
- shoe-pocket length, width, height or gusset
- opening length, zipper direction or zipper corner
- side, end or base position
- shoe orientation or pair count
- main-compartment dimensions
- wet-pocket or bottle-pocket position
- divider, lining, foam, board or support layer
- handle, strap or attachment location
- material thickness, coating or component combination
- packaging shape or packed dimensions
The controlling documents should be clear. Record the sample version, drawing version, shoe reference, buyer comments, affected components, photos and requested changes. Before production preparation, confirm which sample and specification package controls the order.
The custom bag sample approval checklist covers the wider approval record. This article adds the footwear-specific questions that need to be visible in that record.
How Pengtour Can Review a Custom Gym Bag With a Shoe Compartment
Pengtour can evaluate, develop and customize common sewn sports and gym bag projects based on buyer samples, photos, dimensions, structure notes or a Tech Pack. For a shoe-compartment project, useful starting information includes the actual shoes or representative dimensions, pair count, access direction, target bag format, main-compartment load, wet or clean-item separation, carrying method, materials to evaluate, logo and packaging requirements, and expected quantity.
Possible structures may include a side, end or base shoe compartment, depending on the bag format and project review. Final feasibility depends on the dimensions, loading requirements, materials, hardware, accessories, attachment method and sample evaluation. These are project options, not a standard configuration or fixed performance promise.
A development sample can be reviewed for size, shape, structure, shoe fit, removal, closure, zipper operation, pocket access, handle and strap position, logo and packaging. Ordinary loaded review should remain separate from formal load, abrasion, water-resistance, odor, durability or zipper-life testing.
When the load case and layout are ready, send the project through Pengtour's custom soft bag development route. For a quotation, request a project-specific quote with the shoe dimensions, drawings or photos, intended quantity and any defined acceptance or test requirements.
FAQ
Can one shoe compartment fit several shoe styles?
It can be evaluated, but the buyer should identify the controlling range rather than assume that one shoe shape fits every model. The largest or most difficult reference pair may control the pocket and opening, while a wider range may require a documented fit envelope or more than one sample reference.
Is a side shoe compartment better than an end compartment?
Neither position is automatically better. A side opening may make access easier while the bag is upright or on a bench. An end compartment may use the width of a duffel body but project farther into the main compartment. Choose the position from the loading route, shoe shape, main-compartment requirement and carry condition, then verify it with a loaded sample.
Should the shoes be placed sole-to-sole inside the pocket?
That is a layout choice, not a universal rule. Sole-to-sole, heel-to-toe and separated orientations create different pocket shapes, access paths and contact points. Show the intended orientation in the drawing and use the same reference shoes during sample review.
Can ventilation openings make a shoe compartment odor-proof?
No. Ventilation may be evaluated as a way to allow airflow, but it does not by itself prove odor control, hygiene performance or material durability. Any odor-related claim needs a defined project requirement, test method and supporting record.
What should a buyer send for a shoe-compartment gym bag quote?
Send the intended shoe type, the largest reference pair and its dimensions, pair count, preferred pocket position, main-bag contents, target overall size, material direction, carrying method, logo, packaging and expected quantity. Photos, a sketch, a Tech Pack or a physical shoe can make the structure review more specific.
Key Takeaways
- Define the actual footwear before choosing the shoe-compartment size.
- Compare side, end and base access by loading route, opening clearance and main-compartment effect.
- Show the shoe pocket empty and loaded so the lost usable space is visible.
- Review shoes together with clothing, towels, bottles, wet storage and carry points.
- Use the same reference shoes for fit, removal, closure and zipper-path checks.
- Treat ordinary loaded review separately from formal load, water, odor, abrasion, durability and zipper-life testing.
- Record the shoe-pocket layout, affected components, revisions and controlling approval version in the RFQ or Tech Pack.