

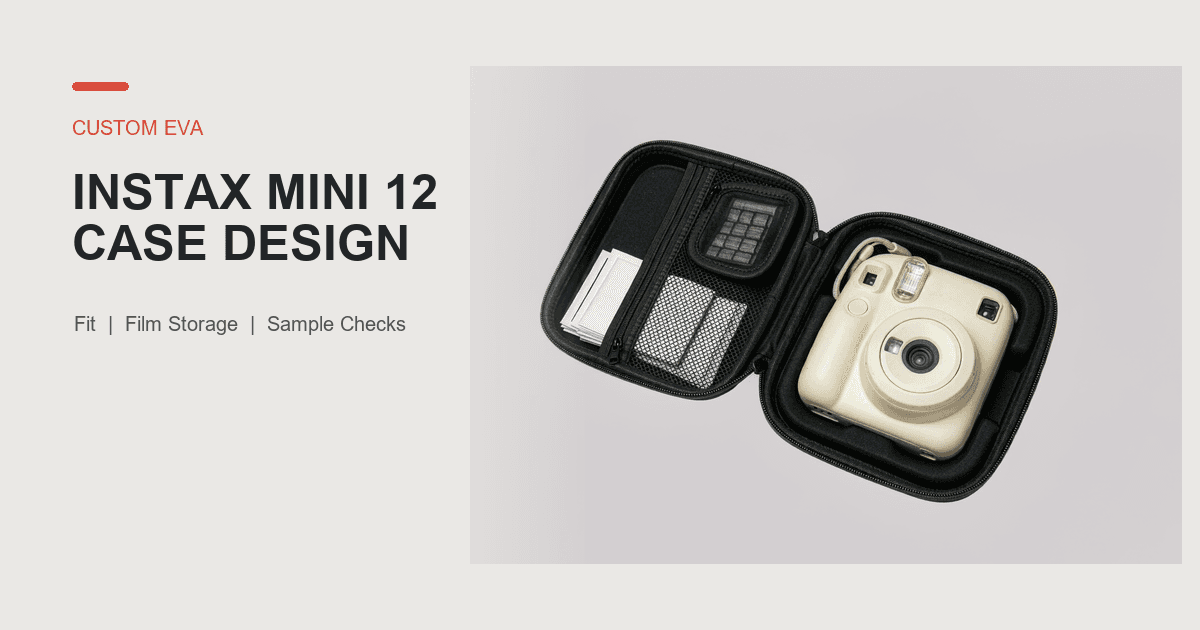
An Instax Mini 12 case should be designed around one confirmed camera revision and the retail kit that will ship with it. A square outline is not enough. The case also needs a clear plan for the protruding lens, flash and viewfinder areas, film packs, batteries, strap, user grip and loaded closure.
A practical development sequence is:
- Freeze the exact camera model, revision and supplied accessories.
- Mark surfaces that can take normal support and areas that should remain clear.
- Choose the camera orientation and hand-removal path.
- Define project-specific fit and support around the lens tower and body.
- Separate film packs, batteries and strap hardware from the camera.
- Review the lid pocket, divider, retention and loaded closing path.
- Check the zipper, opening angle and carrying hardware with the kit loaded.
- Approve a physical sample and record the applicable revision.
This approach gives a buyer useful approval criteria. It also helps a supplier evaluate a custom EVA case for the Instax Mini 12 without treating every instant camera or every Mini-series model as the same shape.
Freeze the Exact Camera and Retail Kit
Start with the actual camera model and the set sold to the customer. A request such as "case for an Instax Mini camera" leaves several design decisions open. Different cameras may vary in body profile, lens position, flash and viewfinder location, grip shape, film-door geometry and strap connection.
Record these inputs before the cavity is drawn:
- Exact camera model and buyer reference code
- Product revision, colorway or housing change that may affect fit
- Maximum finished length, width and depth
- Lens position and maximum protruding profile in the storage condition
- Flash, viewfinder, film slot, film door, controls and strap point
- Surfaces that may accept normal support contact
- Areas that should remain free from concentrated pressure
- Film-pack quantity and packaging dimensions
- Battery quantity and whether batteries ship inside or outside the case
- Wrist strap, shoulder strap, manual, printed photos or other accessories
- Retail box, sleeve, polybag, label and carton requirements
The best fit input is normally a final production camera. A size-accurate model may also support early review. Controlled drawings or 3D data can help establish geometry, but the buyer should identify the file revision and dimensions that remain subject to physical confirmation. The general process for custom EVA case design from 3D models applies here, but the physical camera and loaded kit should still be checked before approval.
Do not assume that one layout covers every sales SKU. A camera-only package, a film bundle and a gift set may need different internal layouts, packing lists or approval records.
Map the Keep-Clear Areas Before Adding Support
An instant camera has several raised or functional areas that should be mapped before the support structure is finalized. The map does not need to predict a universal protection result. Its purpose is to control where the case and its contents contact the camera during ordinary storage and handling.
Mark at least these zones on the layout:
- Lens barrel and surrounding face
- Flash window
- Viewfinder window
- Shutter and other controls
- Film ejection slot
- Film door and latch area
- Strap eyelets or attached wrist strap
- Battery compartment area
- Raised feet, corners or molded body features
The camera may be supported by selected body surfaces while the lens, flash and viewfinder retain appropriate project-specific clearance. The support pattern depends on the actual body shape, lining, insert or molded support method. It should not be reduced to one universal gap or foam thickness.
A keep-clear map also helps the buyer review the lid. A mesh pocket may appear separate when the case is empty, yet a loaded film pack can project toward the camera when the lid closes. The review therefore needs both an empty-state drawing and a loaded-state check.
Choose Orientation and Removal Before Finalizing the Cavity
The camera can face upward, downward or sideways depending on the opening direction, support method and user task. The selected orientation should allow the user to see the camera, grip a stable part of the body and remove it without pulling the lens tower, flash area or strap attachment.
Ask these questions during layout review:
- Which surface rests against the base support?
- Is the lens tower facing a cavity, a lid, a divider or an accessory?
- Can a user place fingers around the body without forcing the camera sideways?
- Does the wrist strap remain inside the cavity or move into a separate channel?
- Can the camera be returned to the same orientation without trial and error?
- Does the case remain stable while the camera is removed?
A finger notch may help, but its position should follow the real grip and removal direction. A notch in the wrong place may expose a control or encourage the user to pull on a weak or raised feature.
Buyers can use the general method for EVA case dimensions and clearance, then apply it to the camera's finished geometry, lining compression, support contact and removal task. The sample should confirm the result rather than relying only on maximum dimensions.
Separate Film Packs, Batteries and Strap Hardware
Film packs are part of the product experience, but they should not be treated as harmless filler. Their packaging has defined edges and thickness. A loaded pocket or loose pack can press toward the camera, interfere with closing or move when the case changes orientation.
Define the film area with these inputs:
- Number and type of film packs in each SKU
- Finished pack dimensions, including retail wrap
- Storage orientation
- Whether the pack sits in a lid pocket, base divider or separate compartment
- Retention method
- Finger access for removal
- Loaded relationship to the lens, flash and body
- Whether printed photos or an album are also carried
Batteries should also have a defined location if they are included. The buyer should state the battery type, quantity, packaging and applicable transport or retail rules. The case itself must not be presented as proving battery-shipping compliance.
Strap clips, buckles and other hard parts should not be left loose against the camera. A simple strap channel, pocket, divider or separate packing method may be evaluated depending on the kit. The same principle applies to manuals, decorative items and gift-set accessories.
Choose the Internal Structure for the Real Kit
An Instax Mini 12 project may use a lined molded cavity, a foam insert, a raised support, an elastic retention feature, a divider or a combination. The correct route depends on the camera geometry, accessory set, case size, user access and sample result.
Use each structure for a defined job:
- A molded or shaped support can locate the camera body.
- A foam insert can create controlled support and accessory cavities.
- A divider can separate film packs or a gift-set component.
- An elastic feature can retain a light item when its pressure and removal remain acceptable.
- A lid pocket can organize flat accessories when loaded depth is controlled.
- A soft lining can cover contact surfaces, subject to the selected material and construction.
The EVA case foam insert guide explains the wider insert decision. For this project, the buyer should focus on which structure supports the camera, which structure organizes film and which components must remain physically separated.
Avoid adding structures only because they appear in a competitor's product photo. A deep mesh pocket, wide elastic strap or thick lid pad can change closing pressure. Every component should have a job that is visible in the loaded sample.
Review Opening, Zipper Travel and Carry Direction
The case is used as a complete system. The camera fit can be acceptable while the opening or carry direction still creates a problem.
During sample review, check:
- Whether the lid opens far enough to expose the camera and film area
- Whether the loaded pocket pulls the lid toward the lens or body
- Whether the zipper closes without unusual force
- Whether the zipper track or puller contacts the camera during loading
- Whether the camera and accessories remain in their intended sections when the case is held upright
- Whether a wrist strap, shoulder strap or handle changes the carrying orientation
- Whether strap attachment points show visible distortion in ordinary loaded handling
- Whether hardware can contact the camera when packed
A wrist strap, top handle and shoulder strap serve different carry tasks. The RFQ should identify the required mode instead of asking for every option by default. Attachment method, reinforcement, hardware and ordinary loaded balance then become part of the sample decision.
Ordinary carrying observations do not establish a certified strap load, cycle life or drop result. If the project needs formal evidence, the buyer must define the method, load, duration, acceptance criteria, sample condition and reporting requirement separately.
Approve the Case With the Full Loaded Sample
An empty case can hide pressure and access problems. Approve the sample with the actual camera and the final accessory set whenever possible.
Use this loaded review sequence:
- Confirm the sample version and the camera/accessory revisions.
- Load the camera, film packs, batteries, straps and printed materials in their assigned positions.
- Check visible camera support and keep-clear areas.
- Remove and replace the camera several times during normal use review.
- Check film-pack and battery access without disturbing the camera.
- Close the lid slowly and observe pocket projection, resistance and zipper travel.
- Hold the loaded case in each intended carry direction.
- Reopen it and check whether any item crossed sections or pressed against another component.
- Compare logo, color, material, packaging and labels with the approved requirements.
- Record pass, conditional approval or revision needed for each item.
The general EVA case sample approval checklist can hold the full record. This model-specific review should be attached to it so the approved camera kit, film quantity and internal layout are unambiguous.
If a change affects camera revision, lens profile, film quantity, pocket depth, support structure, shell shape, opening, carry hardware or packaging fit, evaluate whether a revised physical sample is needed. A drawing update alone may not show the loaded interaction.
This review covers fit, access, closure and visible loaded behavior. It does not prove drop, shock, compression, rain, immersion, scratch, strap-load, zipper-life or transport performance. Those requirements need an agreed method and evidence scope.
Put the Decision Into the RFQ
A useful RFQ separates confirmed facts from open design choices. Include:
Camera and Kit
- Exact camera model and revision
- Photos, controlled dimensions, drawing/3D revision or physical sample availability
- Film-pack type and quantity
- Batteries, straps, manuals, albums and gift-set items
- Separate SKU differences
Layout and Use
- Camera orientation
- Keep-clear areas
- Preferred removal direction
- Film and battery positions
- Lid-pocket or base-compartment preference
- Intended wrist, hand or shoulder carry
- Retail display, travel, gift-set or distribution use
Case and Branding
- Target outside size or packing limit, if applicable
- Outer material direction
- Lining and internal support direction
- Zipper and carrying hardware
- Color references
- Logo artwork, method and placement
- Unit packaging, labels and carton marks
Approval and Evidence
- Required sample stage
- Loaded sample contents
- Measurement method and project-specific acceptance criteria
- Approved reference documents
- Formal test requirements, if any
- Change and re-approval rule
- Target quantity and destination for quotation planning
Avoid an RFQ that says only "hard EVA case for Instax Mini 12 with film pocket." It does not define the camera revision, film load, contact map, pocket depth, removal path, carry direction or approval rule.
Brands comparing custom camera case options should ask each supplier to quote against the same kit and approval scope. Otherwise, lower prices may reflect different internal structures, accessory capacity, packaging or evidence rather than a comparable case.
How Pengtour Can Support an Instax Mini 12 Case Project
Pengtour can evaluate custom camera-case projects using the actual product size, shape, opening, internal layout, insert or molded support, outer material, lining, zipper, handle, pocket, strap, logo, packaging and sample requirements.
For an Instax Mini 12 project, the review can focus on:
- The confirmed camera and retail-kit revision
- Lens, flash, viewfinder and control keep-clear areas
- Camera orientation and hand-removal path
- Film-pack, battery and strap separation
- Lid-pocket depth and loaded closing behavior
- Wrist, handle or shoulder-carry requirements
- Logo, color, unit packaging and labels
- Loaded sample observations and revision records
The final structure, materials, acceptance criteria, MOQ, development schedule and production schedule depend on the confirmed project. The buyer-approved physical sample and final specification package can be used together as production and inspection references.
To start an evaluation, request a custom case quote with the camera model, kit list, film quantity, layout preference, artwork, packaging and target order details.
Frequently Asked Questions
Can One EVA Case Fit the Instax Mini 12 and Other Mini Models?
A shared shell may be evaluated, but compatibility should be confirmed with each actual camera model. Different body profiles, lens positions, flash/viewfinder locations and strap points can change support and access. Do not label a case compatible with multiple models only because their maximum dimensions look similar.
Can Film Packs Be Stored in the Lid Pocket?
They may be stored in a lid pocket if the loaded pocket does not create unacceptable pressure, closing resistance or contact with the camera. Confirm the actual film-pack quantity and packaging in the physical sample. An empty pocket is not enough for approval.
Does an EVA Shell Make the Finished Camera Case Waterproof?
No. The complete result depends on the outer material, seams, zipper, opening and full construction. A water-related requirement needs defined evidence for the finished case. EVA material or a water-resistant component alone does not prove that the complete case is waterproof.
What Should Be Sent for an Initial Instax Mini 12 Case Evaluation?
Send the exact camera reference, finished dimensions, photos or controlled files, film and accessory list, required carry mode, branding, packaging, target quantity and any formal test requirement. A physical camera or size-accurate model is useful for final fit review when available.